Blossom-End Rot on Tomatoes and Peppers
2026-06-09
A dark, sunken, leathery patch on the bottom of a fruit is one of the most disheartening sights in a kitchen garden — the tomato looked fine, and then it wasn't. The good news: this is not an infectious disease and cannot spread from plant to plant; it is a physiological disorder caused by calcium deficiency in the fruit tissue. The root cause is almost always the same — irregular watering — and it is entirely fixable.
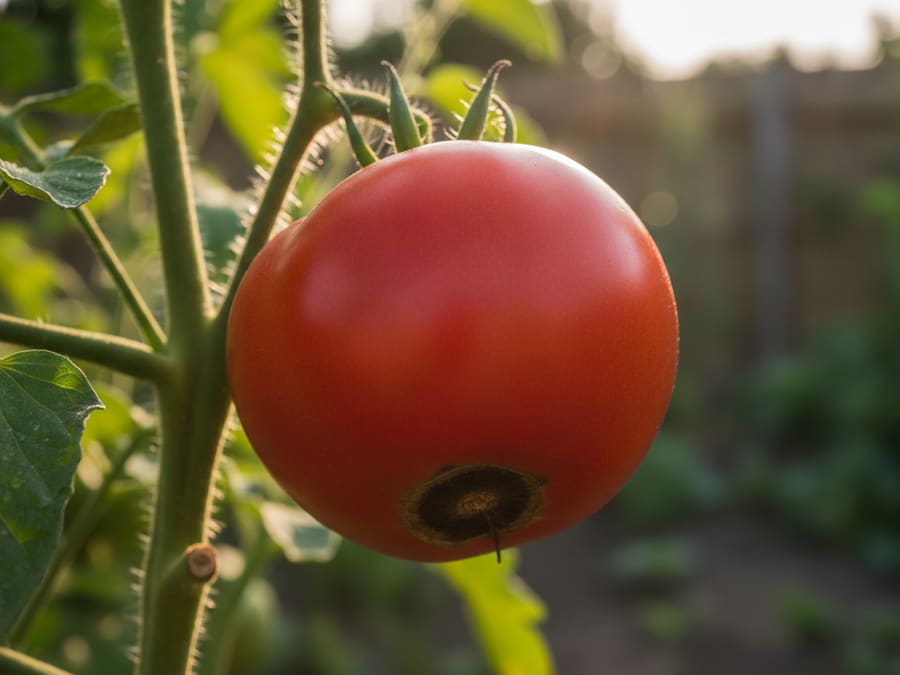
A dark, sunken, leathery patch on the bottom of a fruit is one of the most disheartening sights in a kitchen garden — the tomato looked fine, and then it wasn't. The good news: this is not an infectious disease and cannot spread from plant to plant; it is a physiological disorder caused by calcium deficiency in the fruit tissue. The root cause is almost always the same — irregular watering — and it is entirely fixable.
Why it happens
Calcium travels through a plant only with the flow of water. When soil moisture swings sharply — drought followed by a heavy soak — the roots cannot deliver water evenly to rapidly expanding fruit. The blossom end, farthest from the roots, gets the least calcium; its cells die and collapse, leaving that characteristic dark rot. Fruit is most vulnerable during the first 3–4 weeks after setting, when cells are dividing fastest.
Establish a steady watering routine
The golden rule is consistency: frequent moderate watering beats infrequent heavy watering every time. In hot weather (above 28 °С) water outdoor tomatoes and peppers every 2–3 days, applying 5–8 litres per plant. In a greenhouse with drip irrigation, keep soil moisture at 70–75% of field capacity, never letting it dry out completely between cycles.
Mulch is your best ally
A 7–10 cm layer of mulch — grass clippings, straw, or wood shavings — cuts evaporation and buffers temperature swings in the root zone. Leave a 5 cm gap around the stem to prevent crown rot. Within 3–5 days of mulching, the soil underneath stays moist even on a 30 °С day, which is exactly the stability your plants need.
Foliar calcium spray
At the first signs of rot, spray foliage and developing fruit with calcium nitrate (Ca(NO₃)₂): 20–25 g dissolved in 10 litres of water. Repeat 2–3 times at 7–10 day intervals. Branded formulations such as Brexil Calcium or Calcifol work just as well. Always spray in the early morning or evening — not in direct midday sun — when air temperature is below 25 °С.
What not to do
Avoid heavy potassium or magnesium applications at the same time as calcium; these nutrients compete for uptake and can lock calcium out of the roots even when the soil has plenty. Do not try to salvage affected fruit — once the tissue has collapsed it will not recover; remove those fruits and discard them away from the bed. Do not irrigate with very cold well water during a heat wave: the temperature shock disrupts water balance and makes the problem worse.
Blossom-end rot is your garden's way of asking for steadiness. Consistent moisture, a good layer of mulch, and a couple of calcium sprays — and the next flush of fruit on the same plant will come through clean and healthy.